
🍯 Sticky Honey Garlic Chicken for Busy Weeknights 🍗
1. Introduction — Sticky Honey Garlic Chicken
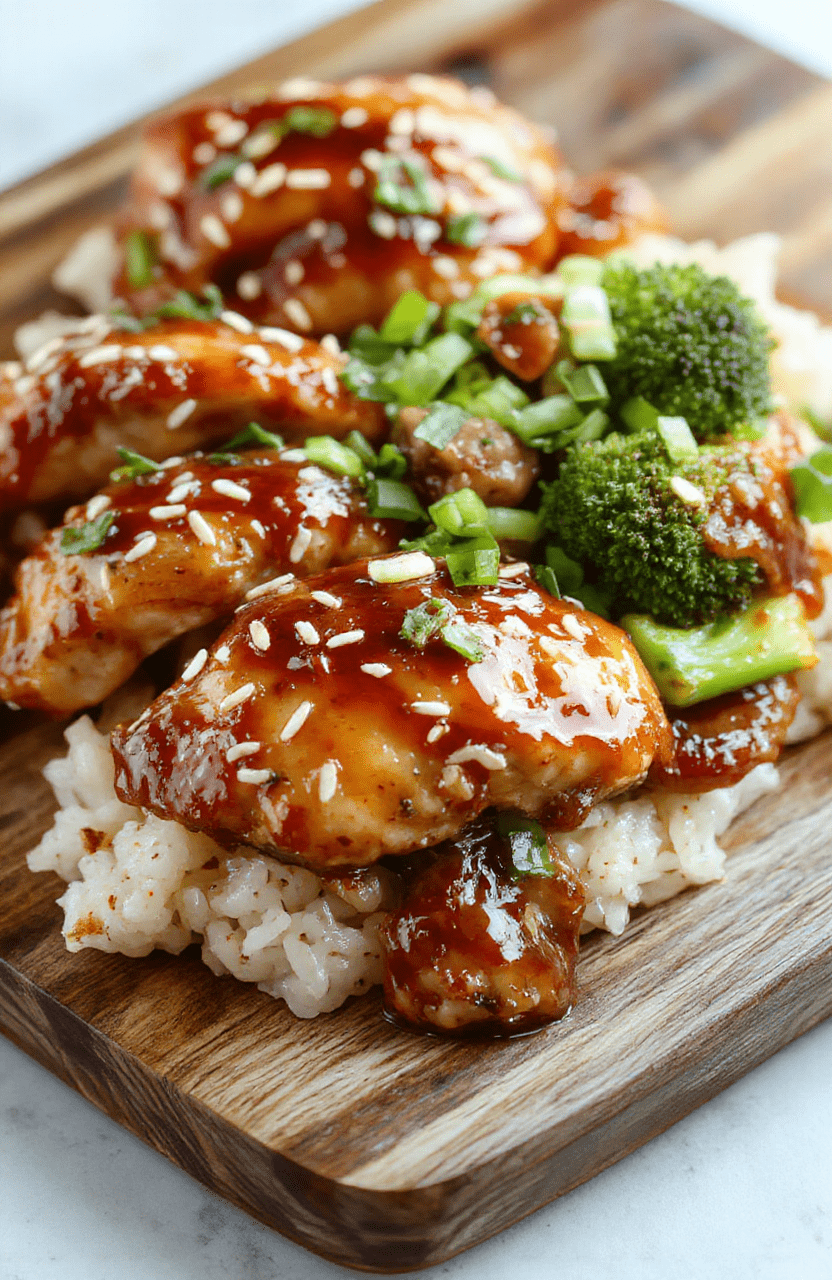
Experience the irresistible sizzle of chicken kissed with a glossy honey-garlic glaze. Sticky Honey Garlic Chicken is the weeknight hero you need: juicy chicken, a caramelized coating, and flavors that feel cozy and comforting. The aroma of seared garlic, soy, and honey will lure everyone to the kitchen. This dish delivers restaurant-worthy depth in under 30 minutes, so you can have a satisfying dinner on the table before the kids’ bedtime.If you’re craving more quick comfort, explore our related recipes: Creamy Chicken Alfredo Pizza for a different take on weeknight flavor, or try a tasty snack like peanut butter oat cups for a sweet bite. For breakfast ideas, see fluffy oatmeal crepes, and if you want a protein-rich muffin, check our healthy chocolate muffins. You can also pair this chicken with a simple, hearty side like one-pan carne con papas.For busy families, a few smart choices—like juicy boneless chicken thighs or breasts, good honey, and a splash of rice vinegar or white wine—make all the difference. This Sticky Honey Garlic Chicken recipe is designed to be flexible, forgiving, and deeply flavorful even on hectic weeknights.
2. Why You’ll Love This Recipe
- Ready in about 25–30 minutes. A fast, weeknight-friendly dinner that tastes like you spent longer.
- One-pan flavor liberation. Searing pan-locks in juices, then glaze creates a glossy, sticky finish.
- Balanced sweetness & savoriness. Garlic, soy sauce, and honey create a dynamic glaze that clings to every piece.
- Versatile and forgiving. Use chicken thighs for juicier meat or swap in chicken breast; adjust sweetness with honey.
3. Ingredient Notes
Key players make all the difference in the glaze. Use high-quality honey—ideally a lightly floral variety—that’s thick enough to cling to the chicken. If you can, opt for low-sodium soy sauce or tamari to keep the glaze from becoming overpowering. A splash of rice vinegar or a teaspoon of apple cider vinegar brightens the sauce and helps balance the sweetness.
Choose chicken that suits your schedule. Boneless, skinless chicken thighs stay juicy as they cook, while breasts keep things lean. Pat the pieces dry before searing to get a crisp, caramelized crust. If you want extra glaze, whisk a 1 teaspoon of cornstarch with 2 teaspoons water to create a quick slurry and stir it in at the end for a shiny finish.
Quality options to consider: – Honey: raw or strained for a more nuanced honey flavor. – Garlic: fresh, finely minced for maximum aroma. – Soy sauce: low-sodium for better balance. – Fresh pepper, a pinch of chili flakes if you like a gentle heat.
Internal recommendations: If you’re craving other easy weeknight dinners, our one-pan carne con papas may inspire your next dinner idea, or try a comforting pasta night with creamy chicken alfredo pizza.
4. Kitchen Tools You Need
Having the right tools helps this dish come together quickly and cleanly. A dependable nonstick skillet ensures you get a perfect sear without sticking. For faster weeknight meals, a compact air fryer can handle sides or reheating leftovers with minimal effort:
Compact 6-in-1 Digital Air Fryer by Amazon Basics — ideal for quick, crisp sides or reheating the glaze-touched leftovers with a little extra crunch.
T-fal 14-Piece Hard Anodized Nonstick Cookware Set — durable, even heating and easy cleanup for searing the chicken and simmering the glaze.
Ninja Foodi Smart XL Indoor Grill & Air Fryer Combo — if you want a one-pot appliance that can sear, broil, and finish with glaze in one device.
KitchenAid Artisan 5-Quart Stand Mixer in Scorched Orange — great for making any side doughs or mashed potatoes to serve alongside this dish.
Optional but helpful gear: Crock-Pot Family-Size Slow Cooker for hands-off meal prep on busy days, or a durable set like CAROTE Premium 16pc Nonstick Cookware Set to cover all your stovetop needs.
These tools keep your kitchen efficient and enjoyable while you master this sticky, glossy chicken glaze.
5. How to Make Sticky Honey Garlic Chicken
The following steps walk you through a sensory-friendly, visual journey—from sizzling to lacquered perfection.
Phase 1: Prep and marinate
Pat the chicken dry and season lightly. Whisk honey, minced garlic, soy sauce, and a splash of vinegar in a small bowl. The aroma should be sweet and savory, with garlicky depth. Let the chicken rest briefly to absorb a hint of the glaze before cooking.
Phase 2: Sear to bronze
Heat a skillet with a thin film of oil over medium-high heat. Place the chicken in a single layer and sear until deeply bronzed on the edges, about 2–3 minutes per side. You should hear a satisfying sizzle and see a caramelized crust forming.
Phase 3: Build the glaze
Pour the glaze into the pan and reduce to a simmer. The liquid will thicken and become glossy. Stir gently so the glaze coats the chicken evenly, turning a rich amber as it clings to each piece.
Phase 4: Finish and plate
Cook just until the chicken is fully cooked through and the sauce is thick enough to coat with a light, syrupy sheen. The kitchen should smell sweet, garlicky, and inviting. Serve with rice, steamed greens, or a simple grain for a complete meal.
6. Expert Tips for Success
- Pat the chicken dry thoroughly before searing to achieve a crisp crust.
- Let the sauce reduce to a thickened glaze before adding more liquid; a too-watery glaze won’t cling.
- Balance sweetness with acidity (a splash of vinegar) to keep the glaze lively.
- Use low-sodium soy sauce to prevent the glaze from becoming too salty.
- Don’t overcook the chicken; pull it just as the center reaches 165°F (74°C) for juicy results.
- Finish with a sprinkle of sesame seeds or chopped scallions for color and aroma.
7. Variations & Substitutions
- Protein swaps: Swap in chicken thighs for extra juiciness or use turkey cutlets for a lighter version.
- Gluten-free: Use tamari or coconut aminos in place of soy sauce.
- Spice level: Add a pinch of chili flakes or sriracha for a gentle kick.
- Oil options: A neutral oil (canola or sunflower) helps the glaze adhere better.
- Make ahead: The glaze can be prepared 1 day ahead and warmed with the chicken for a quicker finish.
8. Storage & Reheating
Store leftovers in an airtight container in the fridge for up to 3 days. Reheat gently in a skillet over low heat, adding a splash of water or broth to loosen the glaze if needed. Leftover glaze thickens as it cools; a quick reheat will loosen it and restore the glossy texture.
9. FAQ
- Q: Can I make this ahead for meal prep? A: Yes. You can prepare the glaze in advance and reheat with pre-cooked chicken for a quick dinner. The glaze may thicken; add a touch of water to re-create the shine.
- Q: Is this dish spicy or mild? A: It’s usually mild, with a balanced sweetness. Add red pepper flakes or a dash of hot sauce if you like heat.
- Q: Can I use chicken thighs? A: Absolutely. Thighs stay juicier and often taste even better with this glaze.
- Q: How do I know when the glaze is ready? A: When it thickens enough to coat the back of a spoon and looks lacquered, it’s ready to coat the chicken.
10. Conclusion
Sticky Honey Garlic Chicken for Busy Weeknights proves you don’t need complicated methods to achieve bold, restaurant-worthy flavor. With a glossy glaze, crisp sear, and juicy chicken, this dish is a dependable weeknight win. Keep the ingredients simple, trust the glaze, and you’ll have dinner that tastes like a treat without the hassle.
Print
Sticky Honey Garlic Chicken for Busy Weeknights
Savory chicken tossed in a sticky honey garlic glaze, seared until caramelized, then finished with soy and rice vinegar. Served with rice and greens for a complete weeknight meal.
- Total Time: 30 minutes
- Yield: 4 servings
Ingredients
- 1 lb boneless skinless chicken thighs or breasts, cut into bite-sized pieces
- 1-2 tablespoons oil for searing
- 2 tablespoons cornstarch (optional, for extra crisp)
- 3 garlic cloves, minced
- 1/4 cup honey
- 1/4 cup soy sauce (or tamari for GF)
- 2 tablespoons rice vinegar
- 1 tablespoon sesame oil
- 1/2 teaspoon red pepper flakes (optional)
- Sesame seeds and sliced green onions for garnish
Instructions
- Season chicken with salt and pepper and toss with a little cornstarch if using; shake off excess.
- Heat oil in a skillet over medium-high heat and brown chicken on all sides; remove to a plate.
- In the same skillet, add garlic and cook 30 seconds until fragrant. Stir in honey, soy sauce, and rice vinegar; bring to a simmer.
- Return chicken to the pan and cook until the sauce thickens and coats the pieces.
- Finish with sesame oil; garnish with sesame seeds and green onions. Serve over rice.
Notes
- For extra glaze, simmer a few minutes longer until sauce is glossy.
- Use GF soy sauce to make this gluten-free.
- Thin with a splash of water if the sauce becomes too thick.
- Prep Time: 15 minutes
- Cook Time: 15 minutes
- Method: Stovetop
- Cuisine: Asian-inspired
- Diet: Dairy-free; Gluten-free option (use GF soy sauce)
Nutrition
- Serving Size: 1 serving
- Calories: 280 Kcal
- Sugar: 12g
- Sodium: 640mg
- Fat: 10g
- Saturated Fat: 2g
- Unsaturated Fat: 8g
- Trans Fat: 0g
- Carbohydrates: 26g
- Fiber: 1g
- Protein: 22g
- Cholesterol: 75mg