

Loaded Cheesy Potato Burritos for Easy Weeknight Dinners 🥔🧀🌯
1. Introduction
Craving something cozy and satisfying? Loaded Potato Burritos are the weeknight answer. This recipe spots a creamy potato filling, melty cheese, and a kiss of paprika tucked inside a warm tortilla, delivering comfort in every bite. The aroma alone—sizzling potatoes, garlic, and toasty tortillas—will transport you to a skillet-filled kitchen full of nostalgia.
These burritos are designed for busy evenings: you’ll pull them together with pantry staples, then bake or crisp to finish with a golden crust. Expect a balance of creamy, cheesy goodness and a softly seasoned potato center that stays tender when you bite in. If you’ve ever wished for a one-pan dinner that feels special, you’ve found it in these Loaded Potato Burritos.
2. Why You’ll Love This Recipe
- Ready in 30 minutes for those hectic weeknights when time is tight.
- One-pot-ish filling, two-bite satisfaction with creamy potatoes and gooey cheese enveloped in a tortilla.
- Customizable—swap in peppers, chives, or jalapeños for extra zing.
- Make-ahead-friendly—prepare the filling ahead, then roll and bake when you’re ready to serve.
- Pairs beautifully with side dishes like a simple green salad or a quick corn salsa.
3. Ingredient Notes
The base is humble but mighty. Russet potatoes hold their shape and mash into a creamy, fluffy center that contrasts beautifully with melted cheese. If you prefer a lighter texture, you can mix in a small amount of mashed cauliflower, but we love the potato-dense richness for that signature burrito bite.
Cheese choice matters. A sharp cheddar offers a bold melt and a bit of tang, while a splash of cream cheese or sour cream in the mashed potatoes adds luxurious creaminess. For extra depth, finish with a handful of crumbled queso fresco or Monterey Jack on top.
For the tortillas, a flour tortilla with a supple texture works best. If you’re gluten-free, seek out high-quality corn tortillas or a certified gf flour tortilla that can fold without cracking. Aromatics like garlic, onion, and a pinch of smoked paprika bring warmth to the filling.
Tip: use internal kitchen ideas to spark additional flavor ideas—these links point to other delicious, approachable recipes on our site that pair well with comforting weeknight meals. And if you love a peppery kick, a small amount of jalapeño or chipotle can be stirred into the potato mixture.
4. Kitchen Tools You Need
Having the right tools helps you glide through weeknights with less stress. Here are a few picks that keep things efficient and tasty:
- Compact 6-in-1 Digital Air Fryer by Amazon Basics — perfect for crisping the burritos to a golden edge without heating up the whole oven. Check price.
- T-fal 14-Piece Hard Anodized Nonstick Cookware Set — dependable pans to boil potatoes, warm tortillas, and sauté aromatics cleanly. See options.
- Ninja Foodi Smart XL Indoor Grill & Air Fryer Combo — a versatile companion for reheating leftovers with a crisp exterior. Explore.
- KitchenAid Artisan Stand Mixer — handy if you like to mash potatoes silk-smooth or whip cream with ease. Learn more.
5. How to Make Loaded Potato Burritos
Phase 1: Prep the potatoes and filling
Dice potatoes into even chunks and parboil until just tender, then drain and let steam off the excess moisture. The goal is a soft center with a little resistive bite. Sauté onions and garlic in a touch of butter or olive oil until fragrant and lightly caramelized—this is where your kitchen fills with an irresistible aroma.
Phase 2: Mash and season
Mash the potatoes with shredded cheddar, a dollop of sour cream, salt, pepper, and a pinch of paprika. The mixture should be creamy and fluffy, not gluey. Taste and adjust salt; a bright pinch of chili powder can wake up the filling nicely if you like a hint of heat.
Phase 3: Roll and fill
Warm the tortillas so they’re pliable, then spoon a generous line of filling down the center. Add optional extras like chives, scallions, or a spoonful of sour cream. Fold the sides in and roll tightly, like you’re sealing a secret inside each burrito.
Phase 4: Finish
Place the burritos seam-side down in a hot skillet to crisp the exterior, or bake at 400°F (205°C) for 12–15 minutes until the cheese is bubbling and the tortillas are bronzed. If using the air fryer, give them a quick 6–8 minute crisp until the outside is crackly and the cheese has melted to a glossy finish.
6. Expert Tips for Success
- Keep the potato mixture slightly loose; over-mashing can make it dense and heavy. A light, fluffy mash yields the best burrito filling.
- Shield the tortilla from tearing by warming it gently; a quick 10-second steam or a 15-second warm in a dry skillet works wonders.
- For extra cheese pull, tuck a thin layer of cheese along the inner edge before rolling so the cheese melts into a stringy center with every bite.
- If your tortillas crack when rolling, try using a softer brand or wrap them in a slightly damp towel for 30 seconds before heating.
- Leftovers freeze well after rolling; reheat from frozen in the air fryer or oven to restore crispness.
7. Variations & Substitutions
- Protein boost — fold in crumbled cooked bacon, shredded chicken, or roasted ground beef for a heartier burrito.
- Vegetarian — swap in smoky red peppers and corn, and use a plant-based cheese substitute if desired.
- Gluten-free — use certified gluten-free tortillas; many brands crisp beautifully in the oven or air fryer.
- Spicy option — stir in a minced jalapeño or chipotle in adobo for a gentle heat that lingers on the palate.
- Make-ahead — assemble the burritos, refrigerate for up to 24 hours, then bake or air-fry when ready to serve.
8. Storage & Reheating
Store assembled burritos in an airtight container in the fridge for up to 3 days. For longer storage, wrap individually and freeze for up to 2 months. Reheat in an air fryer at 350°F (175°C) for 5–7 minutes for a crisp exterior, or microwave briefly followed by a quick crisp in a hot skillet to restore texture.
Tip: re-crisping is key to keeping the outer tortilla from turning soft and gummy. A quick high-heat finish revives the bite you crave in a burrito.
9. FAQ
Q: What exactly makes these Loaded Potato Burritos special?
A: They combine creamy, seasoned potato mash with melty cheese inside a soft tortilla, finished with a crisp edge for a comforting, satisfying bite. It’s like a cozy mashed potato twist wrapped up for weeknights.
Q: Can I freeze these burritos?
A: Yes. Assemble and roll them, then freeze on a tray before transferring to a bag or container. Reheat from frozen in the oven or air fryer until the cheese is bubbly and the exterior is crisp.
Q: Are there gluten-free options?
A: Absolutely. Use gluten-free tortillas or corn tortillas and ensure any added sauces are gluten-free. The filling itself is naturally gluten-free when using dairy and potatoes (check cheese ingredients if you have a strict intolerance).
Q: How can I add more flavor without extra fat?
A: Roast the potatoes with a pinch of smoked paprika and garlic powder for a deeper aroma. Finish with fresh chives or cilantro to brighten every bite without adding heaviness.
10. Conclusion
Loaded Potato Burritos deliver warmth, comfort, and a touch of indulgence in a weeknight-friendly wrap. The creamy potato center, melted cheese, and gently crisp tortilla create a satisfying bite that makes dinner feel celebratory. Whether you’re cooking for weeknights or feeding a hungry crew, these burritos are a dependable crowd-pleaser. Want more delicious shortcuts and comforting weeknight ideas? Explore our other recipes like Creamy Chicken Alfredo Pizza, Fluffy Oatmeal Crepes, and Healthy Chocolate Muffins for more satisfying options that fit into busy schedules. If you’re planning a bigger batch, you might also enjoy our Hearty Carne Con Papas for another comforting, one-pan dinner idea.
Print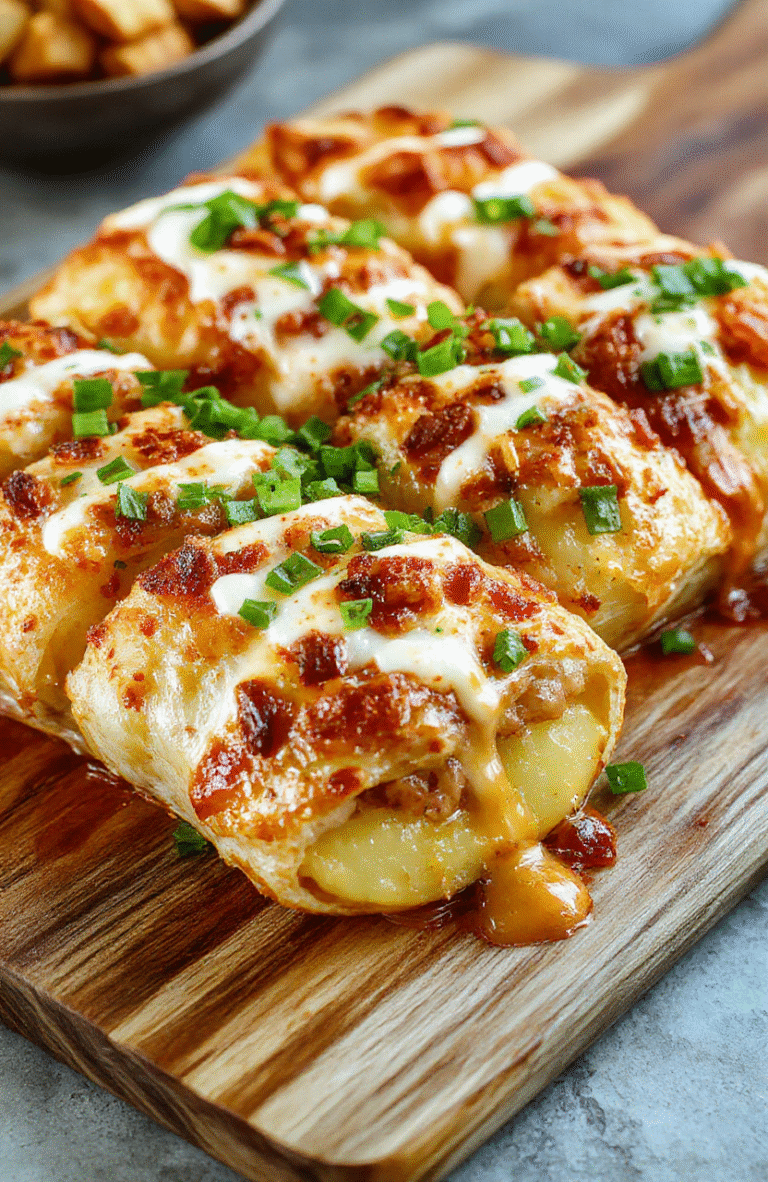
Loaded Cheesy Potato Burritos for Easy Weeknight Dinners
Loaded Cheesy Potato Burritos are a comforting weeknight dinner featuring crispy potatoes, melted cheddar, and creamy filling wrapped in tortillas and baked to bubbly perfection. Simple, filling, and family-friendly.
- Total Time: 40 mins
- Yield: 4 burritos
Ingredients
- 4 cups cooked diced potatoes
- 1 cup shredded cheddar cheese
- 1/2 cup sour cream
- 1/4 cup milk
- 4 large flour tortillas
- 4 slices bacon, cooked and crumbled (optional)
- 1/2 cup chopped green onions
- 1 tablespoon olive oil
- 1 teaspoon paprika
- 1/2 teaspoon garlic powder
- Salt and pepper to taste
Instructions
- Preheat oven to 400°F (200°C). Toss potatoes with olive oil, paprika, garlic powder, salt, and pepper; roast 20-25 minutes until golden and crispy.
- In a bowl, mix roasted potatoes with sour cream, milk, cheddar cheese, bacon (if using), and green onions.
- Warm tortillas to make them pliable. Divide filling among tortillas, roll tightly, and place seam-side down in a baking dish.
- Bake 8-12 minutes until the cheese is melted and the burritos are heated through. Serve warm.
Notes
- Make ahead: refrigerate the filling up to 24 hours.
- Vegetarian option: omit bacon.
- For a lighter version, use low-fat sour cream and cheese.
- Prep Time: 15 mins
- Method: Bake
- Cuisine: American
- Diet: Contains dairy, gluten
Nutrition
- Serving Size: 1 burrito
- Calories: 520 Kcal
- Sugar: 5 g
- Sodium: 900 mg
- Fat: 28 g
- Saturated Fat: 12 g
- Unsaturated Fat: 12 g
- Trans Fat: 0 g
- Carbohydrates: 54 g
- Fiber: 5 g
- Protein: 25 g
- Cholesterol: 70 mg