
🍞 Flaky Cheese Danish Breakfast Bake — easy cheese danish recipe
1. Introduction
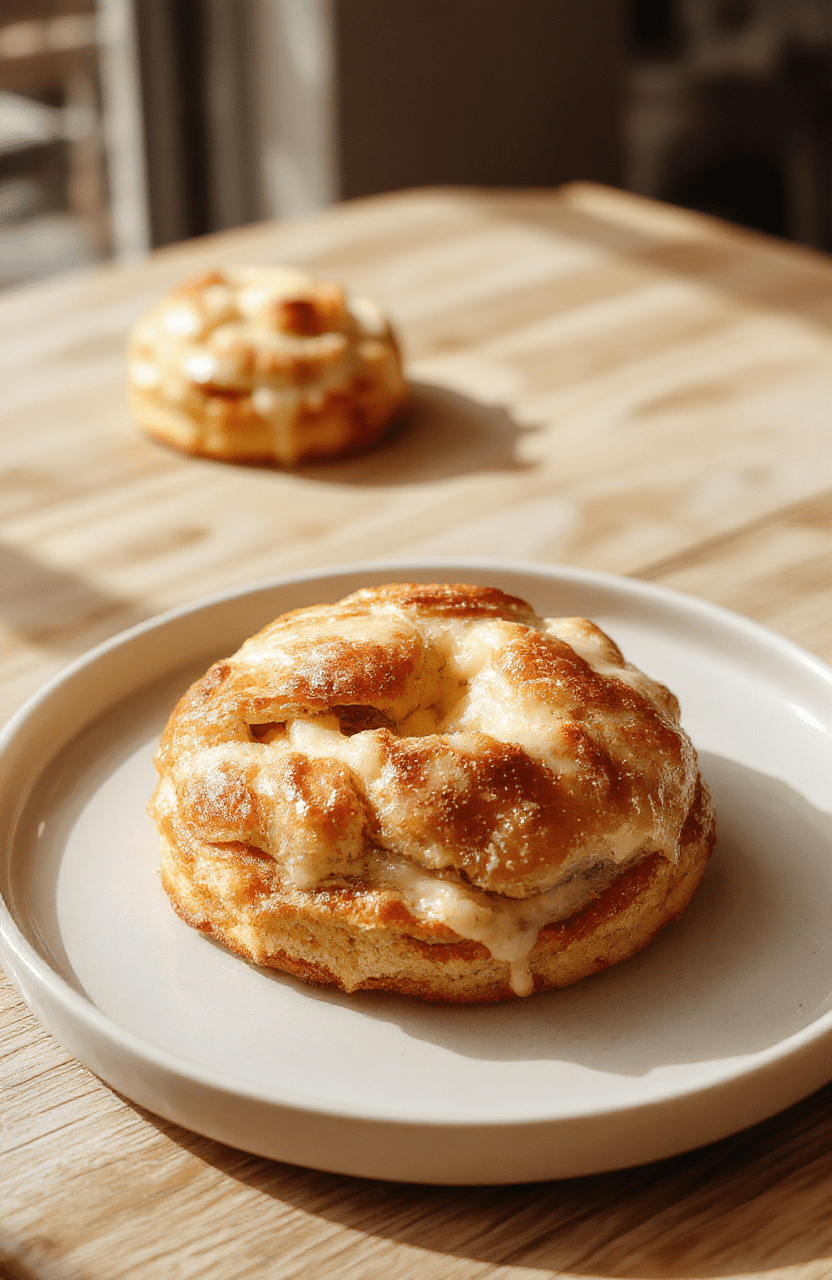
Welcome to your easy cheese danish recipe that tastes like a bakery splurge but comes together in under an hour. This Flaky Cheese Danish Breakfast Bake delivers buttery, lamination-like layers with a creamy, tangy cheese center that melts into every bite. The aroma of toasted pastry and herbs fills the kitchen, making mornings feel celebratory rather than rushed. If you’re craving something cozy yet elegant, this bake hits all the right notes and pairs beautifully with a hot cup of coffee.
Think flaky pastry, silky cheese, and a hint of brightness from chives or dill. It’s a crowd-pleaser for weekend brunches or a comforting weekday breakfast. If you enjoy this style, you might also love our Creamy Chicken Alfredo Pizza for the same indulgent-start to the day, or explore more breakfast ideas in our archives.
2. Why You’ll Love This Recipe
- Ready in about 40 minutes, perfect for weekend brunch or a quick weekday treat.
- Bakery-style layers with a crisp, golden crust and a luscious, cheesy filling.
- One-pan assembly keeps cleanup simple and meal-prep friendly.
- Customize with your favorite cheeses or herbs for a personal touch.
3. Ingredient Notes
The star of this dish is flaky puff pastry, preferably thawed just enough to roll without tearing. I love using a high-fat puff pastry for extra tenderness and rich butter flavor. Cream cheese adds a gentle tang and helps create that irresistible filling that holds its shape when baked. A mix of shredded cheeses—think sharp cheddar with a little Gruyère or Parmesan—gives depth and a bakery-style melt. Fresh herbs, a pinch of garlic powder, and a whisper of paprika finish the aroma and color. If you want a lighter version, swap half the pastry for a prepared filo sheet, but be mindful of the extra crisping steps.
High-quality options: look for puff pastry with real butter and minimal additives; for cheese, choose a well-aged cheddar and a nutty Gruyère. For a dairy-free version, use a creamy dairy-free cheese blend and a dairy-free butter substitute, keeping the filling creamy with a touch of nutritional yeast for depth. If you’re short on time, you can assemble the filling a day ahead and refrigerate until ready to bake.
4. Kitchen Tools You Need
Having the right tools helps you achieve that bakery finish with less stress. The following gear supports even browning, easy assembling, and clean-up simplicity. If you’re building a starter collection, these picks can be a real game-changer:
- Compact 6-in-1 Digital Air Fryer — perfect for finishing edges to a crisp, golden bake or reheating leftovers without drying them out.
- T-fal 14-Piece Hard Anodized Nonstick Cookware Set — reliable pans for prepping and assembling; nonstick makes release flawless.
- Ninja Foodi Smart XL Indoor Grill & Air Fryer Combo — great for toasting a second batch or giving a quick toasting boost to pastry edges.
- KitchenAid Artisan 5-Quart Stand Mixer in Scorched Orange — whisk cream cheese filling to silky smooth without fatigue.
- Philips 7000 Series Pasta Maker with 8 Shaping Discs — optional fun if you’re rolling your own pastry; keeps shapes tidy.
- Presto 23-Quart Induction-Compatible Pressure Canner — for large-batch prep if you’re cooking for a crowd (optional).
5. How to Make Flaky Cheese Danish Breakfast Bake
Phase 1: Prep the pastry and filling
Preheat your oven to 375°F (190°C). Roll out the puff pastry on a lightly floured surface until it’s about 1/8 inch thick. The goal is delicate layers that puff to perfection. In a bowl, beat the cream cheese with a splash of milk until smooth, then fold in shredded cheese, chopped herbs, and a pinch of salt. You’re aiming for a glossy, spreadable filling that softly galaxies into the pastry when baked.
Phase 2: Assemble
Spread the cheese filling down the center of each pastry strip or sheet, leaving a border to seal. Fold the sides inward to create a boat-like pocket, or cut the pastry into wide strips and twist them for a layered look. Brush the top with a little beaten egg for a glossy finish. The aroma of buttery pastry and melted cheese should start to fill your kitchen as it rests on the baking sheet.
Phase 3: Bake and finish
Bake for 20–25 minutes, or until the pastry is deeply golden and the cheese is just set. If the edges brown too quickly, tent with foil for the last 5 minutes. Let the bake rest for a few minutes; the filling will settle and slice neatly. Serve warm, perhaps with a light dusting of chives and a side of fresh fruit. The result should look like bakery style cheese danish with crisp edges and a creamy center.
6. Expert Tips for Success
- Keep the pastry cold until it hits the oven to maximize flakiness. If it softens too much, refrigerate for 10 minutes before baking.
- Beat the cream cheese thoroughly to prevent a grainy texture in the filling. A few tablespoons of sour cream can add creaminess if you prefer.
- Flavor boosters like a pinch of garlic powder, onion powder, or smoked paprika elevate the filling without overpowering the cheese.
- For even browning, place the pan on a preheated sheet pan so heat radiates from underneath.
- Make-ahead option: assemble, refrigerate overnight, and bake in the morning for a hands-off start to the day.
7. Variations & Substitutions
Gluten-free option: use a gluten-free puff pastry, ensuring it’s labeled as such, and adjust bake time as needed since gluten-free pastries brown differently. Dairy-free option: substitute the cream cheese with a vegan cream cheese and use a dairy-free butter substitute; you may need a touch of dairy-free milk to loosen the filling slightly. Cheese swaps: Gruyère, fontina, or gouda can create different melty notes—experiment with a little blue cheese for a sharp bite if you like. For a veggie boost, add sautéed mushrooms or spinach to the filling before baking.
8. Storage & Reheating
Leftovers keep well in the refrigerator for 2–3 days. Reheat in a 350°F (175°C) oven for 8–12 minutes to regain a crisp crust. You can freeze assembled trays unbaked for up to 1 month; bake from frozen, adding 5–7 minutes to the Bake time. If you plan to freeze, consider partial bake time to prevent over-browning when you reheat later.
9. FAQ
Q: Can I freeze the unbaked components?
A: Yes. Freeze the assembled pastries on a tray, then transfer to a bag. Bake directly from frozen, adding a few extra minutes as needed.
Q: What pastry works best for this recipe?
A: Puff pastry gives the flakiest layers, but alternative laminated doughs or even croissant dough can deliver rich texture with a different bite.
Q: How do I prevent the filling from oozing?
A: Beat the cheese until very smooth and avoid overfilling. A light refraining of the filling helps retain shape during baking.
Q: Can I make this recipe dairy-free?
A: Yes. Use dairy-free cream cheese and butter substitutes, and check cheese substitutes for melty texture.
10. Conclusion
This Flaky Cheese Danish Breakfast Bake is a comforting, bakery-style treat you can pull together quickly. By using good pastry, a silky cheese filling, and a few smart tweaks, you’ll deliver a wow-worthy breakfast that sticks to memory and appetite alike. If you enjoyed this easy cheese danish recipe, explore more breakfast ideas on our site and keep your oven busy with your next cozy morning creation.
Print
Flaky Cheese Danish Breakfast Bake
A bakery-style cheese Danish with puff pastry, cream cheese filling, and vanilla. Baked until golden and flaky.
- Total Time: 33 mins
- Yield: 8 pastries
Ingredients
- 2 sheets puff pastry, thawed
- 4 oz cream cheese, softened
- 2 tbsp granulated sugar
- 1 tsp vanilla extract
- 1 large egg, divided
- 1 tbsp milk
- 1 egg for wash
- Pinch of salt
Instructions
- Preheat oven to 400°F (200°C). Line a baking sheet with parchment.
- Roll out puff pastry and cut into rectangles.
- Beat cream cheese with sugar, vanilla, and a pinch of salt until smooth.
- Spread filling along the center of each rectangle, leaving margins.
- Brush edges with a little egg wash and fold to enclose, sealing edges.
- Brush tops with egg wash and bake 15-18 minutes until deep golden.
- Cool slightly, then dust with powdered sugar if desired.
Notes
- Keep filling cold for a cleaner separation from the pastry.
- Chill rolled pastry for extra flakiness if time allows.
- For a lighter filling, substitute part of cream cheese with ricotta.
- Prep Time: 15 mins
- Cook Time: 18 mins
- Method: Baking
- Cuisine: American
- Diet: Vegetarian
Nutrition
- Serving Size: 1 pastry (90 g)
- Calories: 320 Kcal
- Sugar: 8 g
- Sodium: 240 mg
- Fat: 18 g
- Saturated Fat: 9 g
- Unsaturated Fat: 6 g
- Trans Fat: 0 g
- Carbohydrates: 34 g
- Fiber: 2 g
- Protein: 7 g
- Cholesterol: 60 mg