
🍗✨ Homemade Crispy Chicken Tenders: The Ultimate Copycat Chick-Fil-A Copy That’s Even Better Than Takeout!
1. Introduction
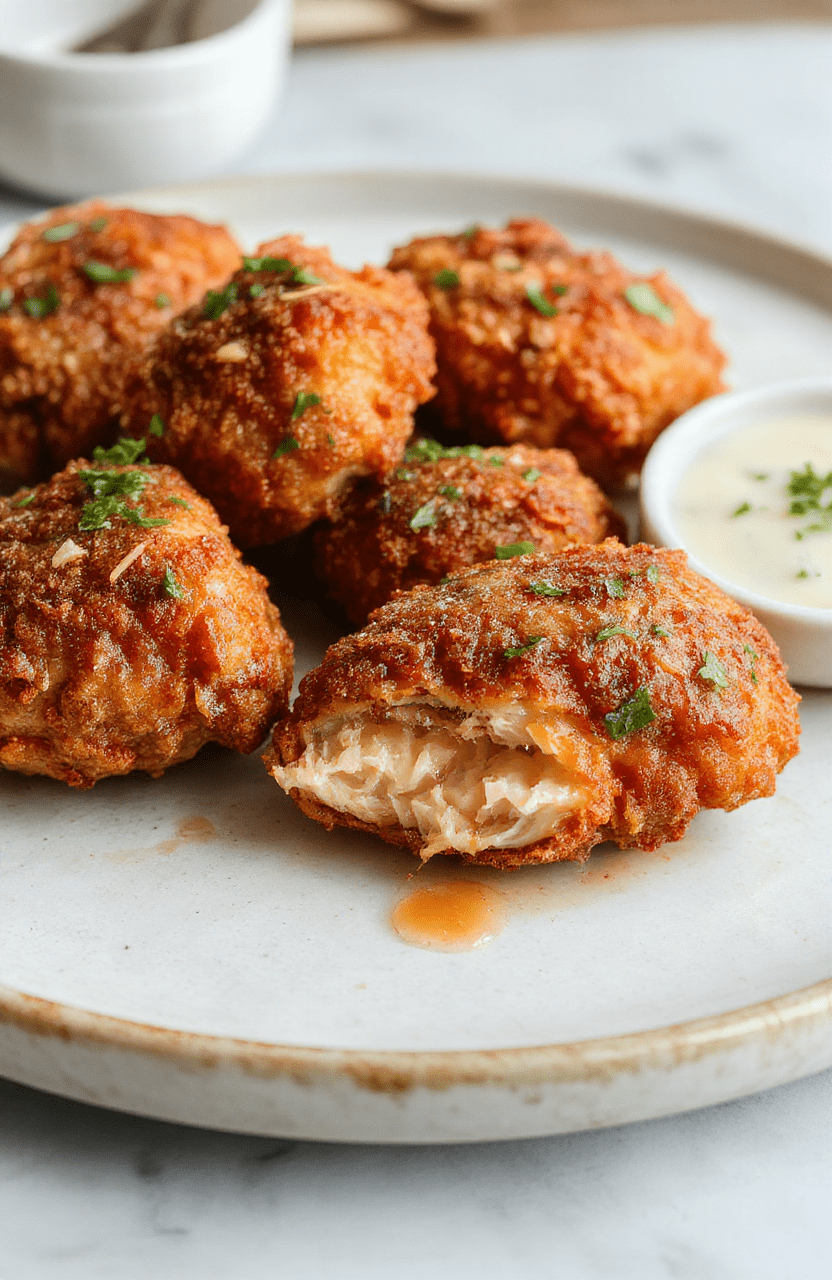
There’s nothing quite like biting into a perfectly golden-brown, extra-crispy chicken tender—crackling outside, impossibly juicy within, and seasoned with that iconic balance of savory, salty, and ever-so-slightly sweet. These homemade chicken tenders aren’t just a nostalgic nod to your favorite fast-food chain; they’re a total upgrade. I spent weeks perfecting this recipe in my test kitchen, comparing brining times, flour blends, and fry temperatures to nail the exact texture and flavor of the original—and I now confidently say these beat the original at their own game. Whether you’re whipping them up for game day, a quick weeknight dinner, or a crowd-pleasing appetizer, this crispy chicken strips recipe delivers restaurant-worthy results—right from your own灶 (or air fryer!).
2. Why You’ll Love This Recipe
- ✔️ Ready in 30 minutes (plus 30-minute brine, which you can do ahead!)
- ✔️ One-pan cooking option—fryer, air fryer, or skillet all work beautifully
- ✔️ Copycat Chick-Fil-A tenders without the excessive sodium or preservatives
- ✔️ Uses simple, pantry-staple ingredients—no fancy sauces or hard-to-find spices
- ✔️ Family-friendly, crowd-pleasing, and endlessly customizable
3. Ingredient Notes
The secret to these homemade chicken tenders lies not in complexity, but in intention. Let me break down why each ingredient matters—and where to splurge for best results:
• Chicken tenderloins: If possible, use fresh rather than frozen. Pre-frozen chicken can release extra moisture, making breading adhesion tricky. If you only have frozen, thaw in the fridge overnight—and never use the microwave, or you’ll risk partial cooking and uneven texture.
• Buttermilk brine: This isn’t optional. Buttermilk tenderizes deeply thanks to its acidity, while also helping the breading cling like glue. If you’re out of buttermilk, stir 1 tbsp lemon juice or white vinegar into 1 cup whole milk and let sit for 5 minutes.
• Wheat flour + cornstarch: Cornstarch is your secret weapon. It browns faster and creates a lighter, crispier crust than flour alone—plus it reduces sogginess by absorbing less oil during cooking.
• Parmesan cheese (finely grated): Yes, really! A spoonful of sharp Parmesan adds umami depth and helps the crust brown evenly. It’s a chef’s trick you’ll see in professional kitchens—and it makes a noticeable difference.
• Seasonings: smoked paprika + garlic powder + onion powder + black pepper: These four pantry staples create that warm, savory backdrop that’s unmistakably “Chick-Fil-A adjacent.” Skip salt here—the chicken is already well-brined.
4. Kitchen Tools You Need
You’ve got the recipe—I’ll help you master it with the right tools. Here’s what I use in my test kitchen to get flawless tenders every single time:
For air frying (one of the easiest hands-off methods): Compact 6-in-1 Digital Air Fryer by Amazon Basics—it’s compact, reliable, and heats fast for consistent crispiness. For larger batches: Ninja Air Fryer Pro Crisp & Roast 4-in-1, with its dual-layer basket and reheating function, it’s a game-changer for leftovers.
For pan-frying on the stovetop: A heavy-bottom skillet is key to even heat distribution. I swear by the T-fal 14-Piece Hard Anodized Nonstick Cookware Set—the deep fryer skillet included makes this process almost foolproof.
Looking to go next-level? The Ninja Foodi Smart XL Indoor Grill & Air Fryer Combo lets you grill, air fry, bake, and dehydrate—all with one appliance. Use the grill function for smoky char, then air crisp for ultra-crispy edges. It’s my go-to for weekend entertaining.
Before you start: I highly recommend a digital instant-read thermometer. Getting your chicken to 165°F without overcooking is the tightrope walk of tenderness—and this tool makes it effortless.
5. How to Make Homemade Crispy Chicken Tenders
This recipe happens in three distinct phases: brine → bread → cook. Get the rhythm down, and you’ll never need takeout again.
Phase 1: The Brine (30 minutes minimum, 2 hours ideal)
In a large bowl, whisk together 1 cup buttermilk, 1 tsp salt, and ½ tsp black pepper. Add 1½ lbs of chicken tenderloins (trim any fat or Sinewy bits—those won’t crisp up well). Cover and refrigerate for at least 30 minutes, but 1–2 hours yields *maximum* tenderness. You’ll know it’s working when the chicken feels slightly plump and firm to the touch.
Phase 2: The Breading Station (The 3-Step Dredge)
In one shallow dish, combine ¾ cup all-purpose flour, 2 tbsp cornstarch, 2 tbsp finely grated Parmesan, 1 tsp smoked paprika, 1 tsp garlic powder, and ½ tsp onion powder. Season generously with black pepper (but *no* additional salt yet—the brine is salty enough).
In a second dish, crack 1 large egg and beat well with 1 tbsp water. This “egg wash” helps the final breading layer stick like a dream.
Now the magic sequence: flour mix → egg wash → flour mix again. Press firmly each time—don’t be shy! You want an even, adherent coat, almost like a crumb “hug.” Let the breaded tenders rest for 5 minutes before cooking: this sets the crust and prevents shedding in the oil.
Phase 3: Cooking To Perfection
• Deep Fry (Most Authentic Crisp)
Heat 1½ inches of neutral oil (like avocado or peanut) in a deep skillet or Dutch oven to 350°F. Fry 3–4 tenders at a time for 2–3 minutes per side, until golden brown and internal temp hits 165°F. Drain on a wire rack (not paper towels alone—steam softens the crust!).
• Air Fry (Crunchy, Lighter & Easier)
Preheat air fryer to 400°F. Lightly spray the basket and arrange tenders in a single layer—no crowding! Cook 8 minutes, flip, spray again, and cook 3–5 minutes more until golden and cooked through. For extra browning, broil (if your air fryer has a broil setting) for 1 minute at the end.
• Servings: This batch yields 4 dinner portions—or double it for 8 appetizer servings. Serve warm with your favorite dipping sauces (more on that in Section 7).
6. Expert Tips for Success
• Cold chicken = crispier crust. After breading, chilling the tenders for 10 minutes in the fridge prevents the breading from sliding off during cooking.
• Don’t skip the second flour dip. That double-dredge is what creates the shaggy, craggy texture that traps flavor and holds up against sauces.
• Oil temperature is everything. Too cool? Soggy, greasy tenders. Too hot? Burnt outside, raw inside. Use an infrared thermometer or deep-fry thermometer—and if you don’t have one, test with a bread corner: it should bubble *vigorously* and turn golden in 20 seconds.
• Rest on a rack. Paper towels trap steam and soften the crust. A cooling rack keeps air circulating underneath—keeping that crunch.
7. Variations & Substitutions
Gluten-free? Swap flour for a 1:1 GF blend (try Bob’s Red Mill) and ensure cornstarch is certified GF. Add 1 tsp xanthan gum for better adhesion.
Keto-friendly? Use almond flour + psyllium husk powder (2:1 ratio) for breading, and skip the buttermilk or use unsweetened almond milk with lemon juice. Baking temp: 375°F for 12–14 minutes (flip halfway).
Extra spicy? Add ½ tsp cayenne to the flour mixture, or toss cooked tenders in a mix of sriracha + honey + lime juice.
Make-Ahead & Reheat? Bake breaded (uncooked) tenders on a parchment-lined tray, freeze solid, then store in ziplocks. Air fry frozen: 400°F for 10–12 minutes (no thawing!).
Dipping Sauce Pairings? Classic honey mustard (mix 3 tbsp mayo, 2 tbsp yellow mustard, 1 tbsp honey), spicy sriracha mayo, or homemade ranch from scratch. I even love them with a smear of your favorite peach or pepper jelly for sweet heat.
8. Storage & Reheating
Store cooled tenders in an airtight container in the fridge for up to 4 days. For longer storage, freeze on a baking sheet until solid, then transfer to freezer bags (up to 3 months).
The reheat hack: Never microwave (we’ve all learned this the hard way!). Air fry at 375°F for 4–6 minutes, or bake on a rack at 400°F for 10 minutes. Spritz with oil before reheating to revive crispiness.
Pro tip: Pair your leftovers with a side of Ultimate Moist Chocolate Banana Bread for the most unexpected—but perfect—sweet & savory combo.
9. FAQ
Q: Can I use chicken breast instead of tenderloins?
A: Absolutely! Cut 2–3 chicken breasts horizontally into ½-inch strips. They’ll need 1 extra minute per side in the fryer—watch for that 165°F internal temp.
Q: My breading keeps falling off! What am I doing wrong?
A: Three culprit checks: (1) Was the chicken pat dry before brining? Excess moisture = slipping crust. (2) Did you press firmly in both flour layers? (3) Was the oil hot enough? Cold oil = breading rinse-off.
Q: How do I get that “shaggy” texture like the original?
A> The flour → egg → flour double-dip is key, but also: don’t let the breaded tenders sit too long before cooking. Wait up to 5 minutes—any longer and the crust starts to wilt.
Q: Can I make these ahead for a party?
A: Yes! Prep and bread up to 24 hours ahead, refrigerate covered. Fry or air fry just before serving. For a bigger crowd, check out this Ultimate Super Bowl Appetizer Platter for pairing ideas—including Sweet & Spicy Honey Pepper Chicken for extra protein power!
10. Conclusion
These homemade chicken tenders are more than just a recipe—they’re your new kitchen MVP. Crispy, juicy, flavorful, and endlessly adaptable, they remind us that great food doesn’t need a drive-thru or a restaurant kitchen. Whip them up tonight, and I promise: next time the craving hits, you’ll already have the answer in your fridge. And if you loved this one, you’ll adore the Dump-and-Go Smothered Pork Chops for comfort-food nights, or the Easy Buffalo Chicken Sliders for game-day crowds. Happy cooking—and happy crunching! 🍗✨
Print
Homemade Crispy Chicken Tenders
Crispy, juicy, and seasoned to perfection — these homemade chicken tenders mimic the popular fast-food favorite but are healthier, faster, and customizable
- Total Time: 25 minutes
- Yield: 4 servings
Ingredients
- 1 lb boneless, skinless chicken breasts, cut into strips
- 2 tbsp buttermilk
- 1 tsp salt
- 1 tsp black pepper
- 1 tsp paprika
- 1 tsp garlic powder
- ½ tsp onion powder
- 1 large egg
- 1 cup all-purpose flour
- ¼ cup cornstarch
- 1 tsp baking powder
- Vegetable oil, for frying (or air fryer/sheet pan method)
- Optional: honey and dijon mustard for dipping sauce
Instructions
- Marinate chicken strips in buttermilk, salt, pepper, paprika, garlic powder, and onion powder for at least 15 minutes (or up to 4 hours).
- In a shallow bowl, whisk together flour, cornstarch, and baking powder.
- Beat egg in a separate bowl.
- Dredge each chicken strip in flour mixture, then dip in egg, then coat again in flour — pressing gently for extra crunch.
- Fry in 350°F oil for 2–3 minutes per side until golden and internal temp reaches 165°F. Alternatively, air fry at 400°F for 10–12 minutes, flipping halfway.
- Drain on a wire rack or paper towels, season with a pinch of flaky salt, and serve warm with dips.
Notes
- For extra crispiness, double-dip the chicken in egg and flour.
- Leftovers reheat well in an air fryer or toaster oven.
- Make it diet-friendly: use almond flour for gluten-free or whole wheat flour for fiber boost.
- Prep Time: 15 minutes
- Cook Time: 10 minutes
- Method: Frying, Breading
- Cuisine: American
- Diet: High Protein
Nutrition
- Serving Size: 3 tenders
- Calories: 320 Kcal
- Sugar: 1g
- Sodium: 520mg
- Fat: 14g
- Saturated Fat: 3g
- Unsaturated Fat: 9g
- Trans Fat: 0g
- Carbohydrates: 28g
- Fiber: 1g
- Protein: 30g
- Cholesterol: 95mg