

🍞 The Easiest Crusty Artisan Bread You’ll Ever Make—No Knead, No Fuss! (Plus Pro Tips for That Perfect Bake)
1. Introduction
There’s something deeply satisfying about pulling a steaming, gold-cracked crust loaf out of the oven—rich aroma filling your kitchen, the interior whispering promises of tender, airy holes, and that audible crack as the crust cools. This easy no-knead artisan bread delivers all of that… with just five pantry staples, a Dutch oven, and less than 5 minutes of hands-on time. Forget complicated techniques or expensive equipment—this homemade crusty bread was perfected by home bakers (and later popularized by James Beard Award–winning baker Jim Lahey) precisely because it’s so accessible. If you’ve ever wanted to try a dutch oven bread recipe that *actually* works the first time, this is your sign to bake it tonight.
2. Why You’ll Love This Recipe
- Zero kneading required—just stir, mix, and walk away while nature does the work.
- Uses pantry staples: flour, water, salt, and yeast—all affordable and easy to find.
- One bowl, one Dutch oven—minimal cleanup and maximum flavor retention.
- Foolproof & forgiving: Ideal for beginners, but impressive enough for bread connoisseurs.
- Ready in ~24 hours (mostly hands-off): Perfect for overnight rising so you can bake fresh in the morning or evening.
Pair it with our Easy Cheesy Burrito Bake, dip in olive oil for a pre-dinner snack, or toast it up for the ultimate grilled cheese base—trust us, it shines in every application.
3. Ingredient Notes
Quality makes all the difference—even in simplicity. Here’s how to elevate your loaf:
- Unbleached All-Purpose Flour (or Bread Flour): Unbleached retains more protein and structure; bread flour (12–14% protein) yields a chewier crumb. Avoid cake flour—it’s too weak.
- Instant Dry Yeast: No need to proof. Unlike active dry yeast, it activates directly in the dough. (Look for a “best by” date at least 6 months out.)
- Sea Salt or Kosher Salt: Avoid iodized table salt—it can impart a metallic taste. Diamond Crystal or Maldon add clean flavor and texture.
- Filter Water or Bottled Spring Water: Chlorine in tap water can inhibit yeast. If your tap water tastes fine, it’s likely fine—but filtered guarantees consistency.
- For Extra Richness (Optional): Add 1–2 tablespoons of olive oil or honey to the dough—don’t skip salt though!
Pro tip: For that true artisan texture, consider sourcing King Arthur Baking’s Bread Flour from their Ultimate Bread Baker’s Cookbook—it’s the gold standard used by pros and home bakers alike.
4. Kitchen Tools You Need
While you can made this in a pinch with basic tools, these high-performing upgrades improve consistency, safety, and cleanup:
- Heavy-Duty Dutch Oven (5–7 qt): Cast iron with tight-fitting lid is essential. Why? It traps steam during the first 20–25 minutes of baking—creating that shatteringly crisp crust and springy crumb.
- Parchment Paper Ring: A trick from Serious Eats—fold into a circle, cut out center, lift dough in—ensures safe, snag-free transfer.
- bench scraper: For easy dough handling and bowl cleanup (seriously—worth the $10).
- Instant-Read Thermometer: Confirm water is 100–110°F—too hot kills yeast; too cold slows fermentation.
Looking to build a bread-baking starter kit? Consider the T-fal 14-Piece Hard Anodized Nonstick Cookware Set—it includes a 5.5-quart Dutch oven with a tight-fitting lid, *or* upgrade to the legendary KitchenAid Artisan 5-Quart Stand Mixer in Scorched Orange to automate mixing (though hand-mixing works beautifully and saves cleanup).
5. How to Make Easy No-Knead Artisan Bread
This recipe unfolds over 24–48 hours with just 5 minutes of active time. The magic happens while you live your life—no midnight timers or kneading marathons.
Phase 1: Mix & Autolyse (5 minutes)
In a large 6-qt bowl, whisk together:
- 3 ½ cups (420g) unbleached all-purpose flour
- ½ tsp (3g) instant yeast
- 1 ½ tsp (9g) fine sea salt
Pour in 1 ½ cups (355ml) lukewarm water (100–110°F). Stir with a wooden spoon or spatula until no dry flour remains—it’ll be shaggy and sticky. Cover tightly with plastic wrap or a damp towel and let rest at room temperature for 12–18 hours (overnight is perfect!).
What to look for: The dough will double in size, bubbly on top and along the sides—evidence of healthy fermentation. It will smell tangy, like sourdough or yogurt.
Phase 2: Shape & Second Rise (2 hours)
Just before baking, lightly flour your work surface and dough. Gently deflate the dough—no punching needed—and fold edges inward to create tension. Shape into a tight round (boule) and place seam-up in a floured kitchen towel or parchment-lined bowl. Cover and let rise at room temp for 1–2 hours (or refrigerate for up to 24 hours for deeper flavor).
Pro tip: The dough is ready when it springs back *slowly* when poked. If it springs back instantly, give it 15 more minutes.
Phase 3: Bake (45 minutes total)
Place your *empty* Dutch oven (with lid) in the oven and preheat to 450°F (230°C) for at least 30 minutes.
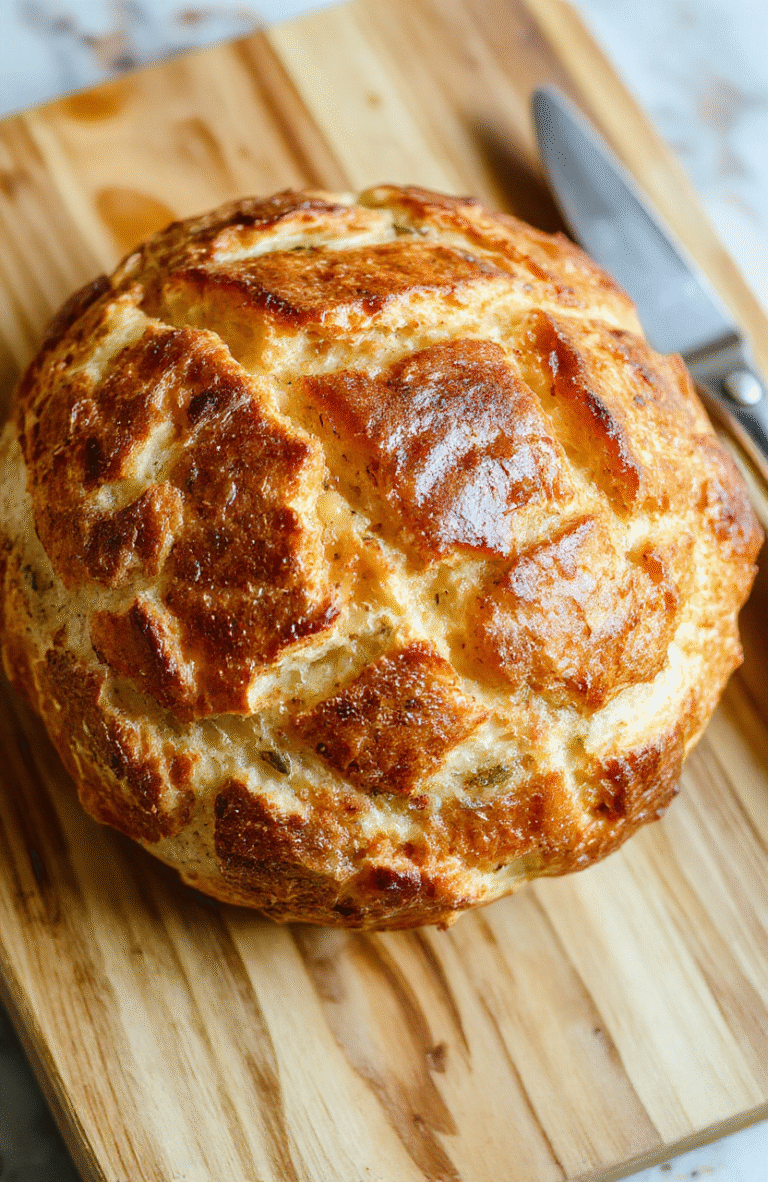
Once preheated, carefully lift the dough (using parchment as a sling) and lower it into the hot Dutch oven. Score the top with a sharp knife or razor blade (¼-inch deep) to let steam escape and encourage “ear” formation.
Put the lid on, bake for 20 minutes. Remove lid, reduce heat to 425°F (220°C), and bake 20–25 more minutes until deep golden brown, internal temperature hits 205–210°F.
Let cool completely on a wire rack—you’ll break the crust too soon if you slice while hot!
6. Expert Tips for Success
- No preheated Dutch oven? Your crust will be pale and soft. Cast iron *must* be screaming hot to generate steam and set the crust fast.
- Score deeply: Shallow scores close up. Aim for ¼-inch—more depth = better oven spring and aesthetic!
- Cold dough = more rise: If short on time, chill the shaped dough overnight. Cold ferments evenly and adds complex flavor.
- Steam hack: If your oven loses蒸汽 easily, place a shallow pan of hot water on the bottom rack during the first 20 minutes of baking.
- Flour matters: Higher-protein flour = more gluten = better structure. If your loaf collapses, try bread flour next time.
7. Variations & Substitutions
Make this recipe *yours* with these thoughtful tweaks:
- Whole Wheat: Replace up to 50% of the flour with whole wheat (add 1–2 tbsp extra water—it drinks more).
- Herb & Garlic: Fold in 2 tbsp dried rosemary + 1 tsp garlic powder + ¼ cup grated Parmesan during the initial mix.
- Seeded: Stir in 2 tbsp sunflower, flax, or pumpkin seeds—great for texture and crunch.
- Gluten-Free: Use a 1:1 GF blend (like Bob’s Red Mill) + 1 tsp xanthan gum. Note: Texture will be denser, but still delicious!
- Sourdough Option: Swap instant yeast for ½ cup (120g) active sourdough starter, reduce water by 2 tbsp, and let bulk ferment 6–8 hours at room temp before chilling.
8. Storage & Reheating
Room temp (1–2 days): Wrap cooled loaf in a clean kitchen towel to retain crustiness. Avoid plastic—it softens the crust.
Fridge (up to 5 days): Wrap tightly in foil. *Reheat unwrap in a 350°F oven for 10–15 minutes* to revive crust.
Freezer (up to 3 months): Slice and freeze in a zippered bag. Toast straight from frozen—or thaw at room temp for 2 hours and warm in oven.
Reviving stale bread: Sprinkle with water, wrap in foil, and bake at 350°F for 10 minutes. It’ll taste bakery-fresh!
9. FAQ
Why did my bread turn out dense?
Most common causes: Yeast expired or killed by hot water, over-proofed dough (sags when poked), or Dutch oven not hot enough. Always check your yeast’s expiration date and preheat the pot well.
Can I make this without a Dutch oven?
Yes! Use a heavy oven-safe pot with lid (like Le Creuset or CorningWare). Alternatives: bake on a sheet pan with a baking steel + oven-safe bowl of water for steam—but the crust won’t be *quite* as crackly.
My loaf stuck to the pot—help!
Always line the pot with parchment paper (make a sling two inches overhanging on all sides). Dust the parchment lightly with cornmeal or flour before placing dough. Avoid greasing the pot—it can smoke at high heat.
How do I get a darker, shinier crust?
Brush the score lines with water or egg wash (1 egg + 1 tbsp water) *before* scoring. For extra sheen, brush the cooled loaf with melted butter—but save that for sweet loaves.
10. Conclusion
This easy no-knead artisan bread proves that greatness doesn’t require time, skill, or fancy gear—just trust in the process. Once you master this foundational recipe, the kitchen becomes your playground: pair with our Crispy Chicken Caesar Sandwich, use for French toast, or tear and share with friends over homemade Peach Lemonade.
Bread baking isn’t just about sustenance—it’s patience, presence, and the simple joy of creating something real. Ready your Dutch oven: your first loaf of bakery-quality bread awaits.
Easy No-Knead Artisan Bread in Dutch Oven
A foolproof, no-knead sourdough-style loaf with minimal effort and maximum flavor—baked in a Dutch oven for that perfect bakery-quality crust.
- Total Time: 19 hours 15 minutes (mostly inactive)
- Yield: 1 loaf (8–10 servings)
Ingredients
- 3 cups (360g) all-purpose flour or bread flour
- 1 1/4 teaspoons (7g) fine sea salt
- 1/4 teaspoon (1g) active dry yeast or instant yeast
- 1 1/2 cups (355ml) warm water (about 100°F)
- Cornmeal or parchment for dusting
Instructions
- In a large bowl, whisk together flour, salt, and yeast.
- Add warm water and stir until a shaggy dough forms—no kneading needed.
- Cover bowl with plastic wrap and let ferment at room temperature for 12–18 hours (until bubbly and doubled).
- Preheat Dutch oven (with lid) at 450°F for 30 minutes. Line with parchment, dust with cornmeal.
- Scrape dough onto parchment, shape into a round, and let rest 30 minutes.
- Transfer dough (on parchment) into hot Dutch oven, cover, and bake 30 minutes.
- Uncover, reduce heat to 425°F, and bake 15–20 minutes more until deep golden brown.
- Cool entirely on a wire rack before slicing.
Notes
- Long fermentation builds flavor—don’t rush it!
- If using active dry yeast, proof in warm water + pinch of sugar for 5 mins first.
- For extra crisp crust, add 1 tbsp vital wheat gluten (optional).
- Prep Time: 15 minutes
- Cook Time: 45 minutes
- Method: Baking
- Cuisine: American
- Diet: Vegetarian
Nutrition
- Serving Size: 1/10 loaf (75g)
- Calories: 170 Kcal
- Sugar: 0g
- Sodium: 280mg
- Fat: 1g
- Saturated Fat: 0g
- Unsaturated Fat: 0g
- Trans Fat: 0g
- Carbohydrates: 35g
- Fiber: 2g
- Protein: 5g
- Cholesterol: 0mg