
© Original Recipe By Mom’s Meals ©
🍪✨ Chewy Chocolate Thumbprint Cookies: An Easy Fudgy Dessert Delight!
1. Introduction
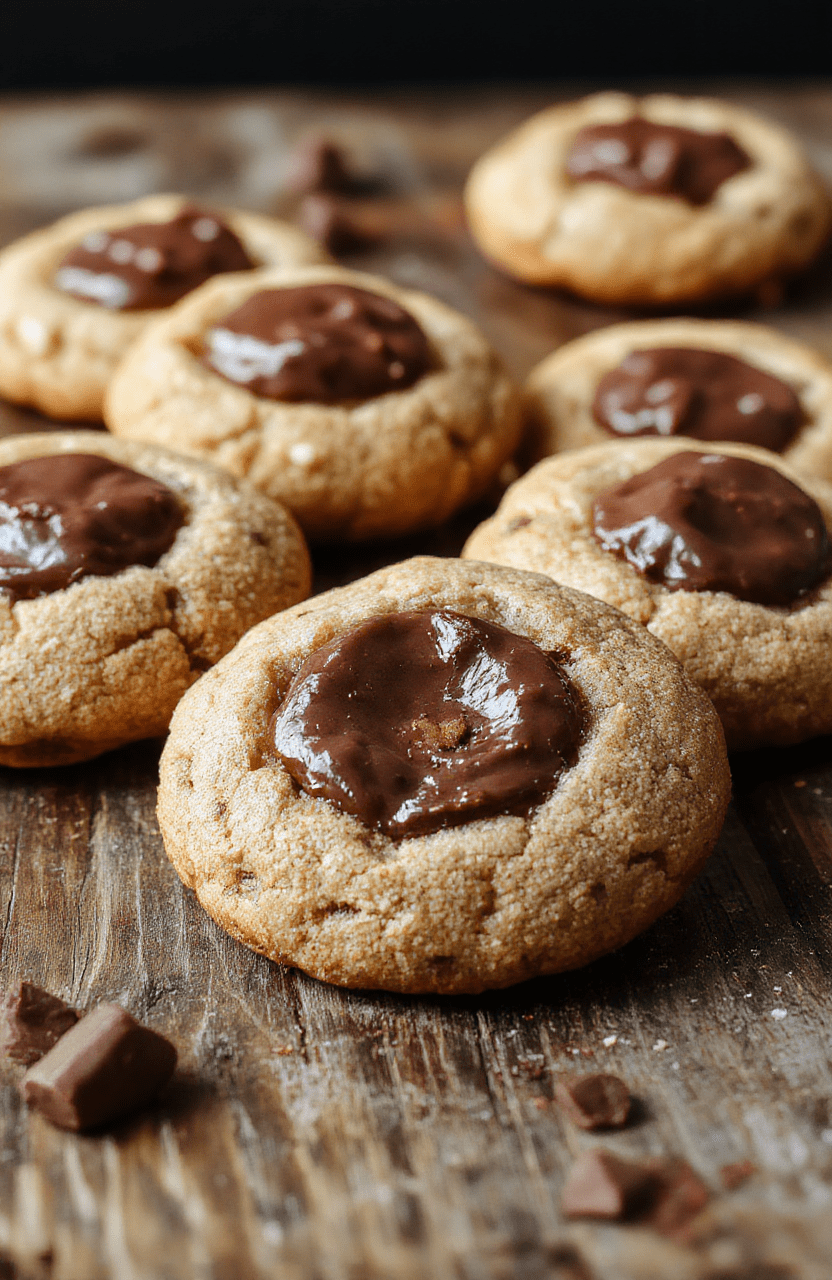
If you’re craving a decadent, bite-sized treat, look no further than these Chewy Chocolate Thumbprint Cookies. Their rich, fudgy centers nestled in crisp, buttery cookies make for an irresistible dessert that’s perfect for any occasion. The magic lies in their perfectly chewy texture paired with a luscious chocolate center, offering a sensory explosion with every bite. Whether you’re baking for a holiday gathering or just need a quick sweet fix, these thumbprint cookies come together effortlessly, satisfying both your sweet tooth and your urge to create something special.
2. Why You’ll Love This Recipe
- Ready in 30 minutes – Perfect for quick dessert cravings!
- One-bowl simplicity – Minimal cleanup and fuss.
- Fudgy, chewy texture that melts in your mouth.
- Versatile – Great for pairing with coffee, milk, or as a party treat.
- Impressive appearance—beautifully glossy chocolate centers make these cookies delightful to look at and even better to eat.
3. Ingredient Notes
Choosing high-quality ingredients really elevates these chocolate thumbprint cookies. Use unsweetened or bittersweet chocolate for the centers—something with a rich cacao flavor that complements the buttery cookie base. Opt for fresh, high-quality butter to achieve that perfect melt-in-your-mouth texture. For the flour, all-purpose works best, but for added richness, some bakers like to incorporate a touch of cocoa powder into the dough.
Brown sugar adds a subtle molasses note, intensifying the chocolate flavor, while vanilla extract enhances depth. When selecting chocolate chips or disks, go for semi-sweet or dark chocolate—these provide a perfect balance of sweetness and bitterness, making the fudgy centers downright irresistible.
4. Kitchen Tools You Need
To make these easy fudgy dessert cookies, a few reliable kitchen tools make all the difference:
- Compact 6-in-1 Digital Air Fryer: This versatile gadget offers even baking and quick cleanup for your baking sessions, perfect for small batch recipes like these cookies.
- T-fal 14-Piece Hard Anodized Nonstick Cookware Set: Nonstick pans help prevent cookie sticking and facilitate easy removal without breakage.
- Ninja Foodi Smart XL Indoor Grill & Air Fryer Combo: If you want to experiment with air-frying to get a crispy exterior, this tool simplifies the process.
5. How to Make Chewy Chocolate Thumbprint Cookies
Step 1: Prepare the dough
Start by creaming softened butter with brown sugar until it’s light and fluffy, releasing a warm, caramel aroma. Mix in vanilla extract for depth. Add egg yolk and stir until combined—expect a velvety, rich mixture. Gradually incorporate the flour, cocoa powder, and a pinch of salt, folding just until a soft dough forms. The dough should be slightly sticky but manageable.
Step 2: Shape the cookies
Use a teaspoon or small cookie scoop to portion out dough balls. Roll each into a smooth ball and arrange on a parchment-lined baking sheet. Use your thumb or the back of a teaspoon to create a well in the center of each.
Step 3: Bake the cookies
Bake in a preheated oven at 350°F (175°C) for about 10-12 minutes. The edges should set while the centers remain soft and slightly chewy. You’ll notice a delightful chocolate aroma wafting through your kitchen as they bake.
Step 4: Fill with chocolate
While the cookies are still warm, press a small piece of chocolate or chocolate chip into each indentation. The heat will soften the chocolate, helping it melt into a glossy, fudgy center. Allow the cookies to cool completely for the best texture and appearance.
6. Expert Tips for Success
- Chill the dough for 30 minutes if it feels too sticky—this makes shaping easier and results in more uniform cookies.
- Use quality chocolate for the filling; it directly impacts the rich, fudgy flavor.
- Avoid over-baking; cookies are meant to be soft and chewy—not crunchy.
- For extra flavor, sprinkle sea salt on top of the chocolate filling before cooling—this enhances the sweetness and adds a gourmet touch.
7. Variations & Substitutions
For those with dietary needs or preferences, here are some ideas:
- Vegan: Use plant-based butter and dairy-free chocolate.
- Gluten-free: Substitute all-purpose flour with a gluten-free blend.
- Nutty twist: Mix chopped pecans or hazelnuts into the dough for added texture and flavor.
8. Storage & Reheating
Keep these cookies in an airtight container at room temperature for up to 3 days—or in the refrigerator for a week. To enjoy them fresh and gooey, reheat briefly in an oven or microwave. For an even more decadent experience, try warming and then adding a dollop of whipped cream or a scoop of vanilla ice cream.
9. FAQ
Can I make these cookies ahead of time?
Absolutely! Prepare the dough, shape into balls, and freeze. Bake straight from the freezer for extra chewy centers. The cookies will keep well in the freezer for up to a month.
What chocolate is best for the filling?
Use high-quality semi-sweet or dark chocolate—such as premium chocolate disks or chips—for an authentic fudgy taste and glossy appearance.
Can I substitute cocoa powder in the dough?
Yes. Adding a bit of unsweetened cocoa powder enhances the chocolate flavor further. Adjust the flour accordingly to maintain the right dough consistency.
10. Conclusion
These chewy chocolate thumbprint cookies are the perfect indulgent yet simple dessert for every chocolate lover. Their fudgy centers and crispy exterior make every bite a joy. With just a few ingredients and a quick baking time, you can impress friends and family with these delightful treats. Happy baking!
Print
Chewy Chocolate Thumbprint Cookies Easy Fudgy Dessert
Chewy chocolate thumbprint cookies with rich fudgy centers, baked to perfection. A quick and delicious treat for chocolate lovers.
- Total Time: 27 minutes
- Yield: 24 cookies
Ingredients
- 1 cup unsalted butter, softened
- 1/2 cup granulated sugar
- 1/2 cup brown sugar
- 2 cups all-purpose flour
- 1/2 cup Dutch-processed cocoa powder
- 1 teaspoon vanilla extract
- 1/4 teaspoon salt
- 1/2 cup jam or ganache for filling
Instructions
- Preheat oven to 350°F (175°C).
- Cream together butter and sugars until light and fluffy.
- Mix in vanilla, then gradually add flour, cocoa powder, and salt until combined.
- Form dough into 1-inch balls, place on lined baking sheet.
- Make an indentation in each ball using your thumb or a spoon.
- Fill centers with jam or ganache.
- Bake for 10-12 minutes until edges are set.
- Allow to cool before serving.
Notes
- Use high-quality cocoa for best flavor.
- Replace jam with chocolate ganache for extra richness.
- Store in an airtight container for up to a week.
- Prep Time: 15 minutes
- Cook Time: 12 minutes
- Method: Baking
- Cuisine: American
- Diet: Vegetarian
Nutrition
- Serving Size: 1 cookie
- Calories: 150 Kcal
- Sugar: 12g
- Sodium: 30mg
- Fat: 8g
- Saturated Fat: 5g
- Unsaturated Fat: 2g
- Trans Fat: 0g
- Carbohydrates: 18g
- Fiber: 2g
- Protein: 2g
- Cholesterol: 15mg